1. Introduction
This article uses the Integration Services Conditional Split Data
Transformation element to filter and transfer data from a set of
flat text
files to SQL Server database table. The concept can be easily extended to apply to any other source or destination such as Microsoft Excel. This scenario is useful in creating denormalized database tables in a reporting and analysis situation.
2. Data Load Task
Before we start writing any ETL (Extract,
Transform and Load) task, we should first layout a rough sketch of the task and sub tasks involved in the
package. In this simple tutorial, we are planning to write an ETL
package that does the following:
- Read a set of text files from a folder, each with a common format
- Separate the records in the files into two groups
- Load each group into designated destination table
In this tutorial, we have a set of
files that include flower plant names and their types, i.e., Seasonal or Perennial. The
files are from different sources but have the same format with a header and data rows. The data elements are comma separated values. The attached compressed
file includes a top
folder SSISSolution. This
folder has two sub
folders, i.e., the
DataFiles folder containing the two sample data text
files and
SSISConditionalSplit Visual Studio 2008 solution
folder. When you unzip the
folder on your local machine, you can open the solution
using Visual Studio 2008. However, you will have to update the
package for all the connection information based on your SQL Server 2008 installation.
3. Project Setup
Open Visual Studio 2008 IDE and setup an
SSIS project as shown in the diagram below. After you name the solution, click OK to create the project. The
package will be named as
Package.dtsx by default. You may rename the
package if you wish.
4. Add Foreach Loop Container on the Control Flow Panel
Select and drag a Foreach Loop Container control flow element from the toolbox on the left panel of the IDE to the control flow design surface. Rename the element to something meaningful such as "Loop Over Nursery Flower Source". While the control is selected on the design surface, double click on it to open its properties dialog. The dialog is shown in the figure below:
Next, create a variable to hold the
file names iterated in the Foreach Loop Container. Select the "Variable Mappings" on the properties dialog of the loop container and then select the "New Variable" item from the combo drop down as shown in the figure below:
Now, in the new variable dialog shown below, specify the variable container scope as
Package and name the variable as
vSourceFile, namespace as
User and type as
String and click ok on both dialogs to return to the control flow surface.
5. Create Flat File Source Connection Manager
In this example, the source of our data are a set of text
files in a
folder and the destinations are SQL Server 2008 tables. Right click on the connection managers pane on the IDE and choose the "New
Flat File Connection...". The
Flat File Connection Manager dialog opens as shown in the figure below:
Specify the entries as shown.
- Connection Manager Name
- File Name
- Header row delimiter as Comma{,}
- Select the check box to use the column names in the first row
All other entries you can leave as default. Note that even if connection will execute within the loop container to use a different
file in each loop, you can still specify
one file. As you will see below, you need to configure the expression of the
flat file connection manager to point to the Foreach Container Loop variable we have already created.
Now, you need to create an expression for the connection string of the
Flat File Connection Manager to point to the
file variable of the Foreach Loop Container. Select the
Flat File Connection Manager you just created and then go the properties pane in the solution explorer and click the "..." button across the expression entry on the properties tree view. This will open the Property Expression Editor dialog as shown below. Select the "Connection String" entry in the left combo box.
Now, click the "..." button for the Expression Builder dialog as shown below. Select the
file variable and specify the expression as shown in the dialog and click Ok to close the dialog. This will bind the variable to the connection manager.
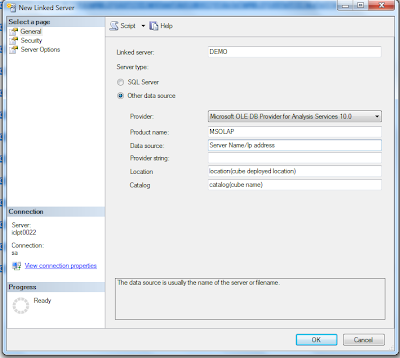
6. Create SQL Server Database Destination Connection Manager
Right click the connection manager pane and select "New ADO.Net Connection" entry. On the dialog that opens, click the "New.." button to open the Connection Manager dialog and make selections as shown in the dialog below. Note that the selections of server name and type of connection you specify depends upon the SQL server 2008 you have setup on your local computer.
7. Add a Data Flow Task to the Foreach Loop Container
Drag a Data Flow Task from the Control Flow Items pane to the surface of the Foreach Loop Container. Note that this Data Flow Task is a control flow element and will control the execution of the data flow tasks configured on the Data Flow panel. You may also rename the Data Flow Task to something meaningful like "Split Text Data". The control flow surface with the connection manager will look something as shown in the dialog below:
8. Configure Data Flow
Now, double click the data Flow Task on the loop container. This will select the Data Flow tab panel on the designer and display the "Data Flow Sources", "Data Flow
Transformations" and "Data Flow Destinations" on the tool box pane on the left of the designer. Drag a
Flat File Source item from the tool box and place on the Data Flow surface. Double click the
Flat File Source to open the properties dialog. Select the
Flat File Connection manager you have created in this tutorial in the combo box of the dialog.
Now, drag a Conditional Split element from the Data Flow
Transformations panel to the Data Flow surface and connect the
Flat File Source to the conditional split by dragging the green arrow from the
Flat File Source to the Conditional Split. Double click the Conditional Split element to open the dialog as shown below:
On this editor, you will create condition for splitting the data to send to the source. Because the Conditional Split is linked to the source that has the connection to the
Flat File Source, you will be able to create condition based on the data. We will create the following two conditions. The fact that we can specify multiple conditions is a powerful visual and computational feature of
SSIS. This is extremely useful in reporting and analysis situations.
- Pick up all perennial flowers
- Pick up all seasonal flowers
In the dialog shown above, expand the column names node and drag
PlantType column to the table rows below and name the condition and output name as shown in the dialog. This completes the Conditional Split specification. Next we will add the destinations for the two filtered datasets.
Drag two ADO NET destinations to the Data Flow panel. Rename the destination to something meaningful. Drag the output green arrows from the Conditional Split to the destinations. As you drag the green arrow to the destination, you will be prompted with the following dialog to specify the filter condition for the destination. The dialog is shown below:
Select the condition you have specified before and click ok. Now, you need to select the destination table. Double click the destination dialog to open the editor. Choose the ADO NET connection manager from the drop down and and the destination table as shown in the dialog below. Optionally, you can go to the Mappings pane on the editor and setup the mappings between the filtered source columns and destination table columns. You can do this by dragging the source column to the mappping table on the lower panel of the editor dialog. Both the views of this destination dialog editor are shown in the figures below:
The final layout of the data flow pane should look similar to the
one shown in the figure below:
Now, you can run the
package in the Visual Studio environment and verify that the two destination tables are populated with the filtered record sets.
9. Conclusion and Discussion
This simple tutorial demonstrates the usage of conditional split transfomation in
SSIS. The sample can be extended to any source and destination with modifications to connections and split conditions. This feature of the SQL Server 2008 provides powerful mechanism for visually designing ETL
packages for reporting, analysis and data wareho
using scenarios without writing a single line of code.
In subsequent articles in this column of Project, I will cover other advanced
SSIS data
transformation tools and their usage.
Thanks for reading .. more to come :)
 8.Select Server Option Tab .


